INF-250: Web Design and Development — Javascript and the DOM
Announcements
Next Week: Quiz 4 is due next week on Sunday, April 12.
Following Week: Assignment 3 (JavaScript) is due on Sunday 4/19. It's already open if you want to get a head start!
Looking Ahead: Reminder that there is no final exam in this class. Your final will be comprised of submitting your polished website along with a reflection (either written or video). More details on the reflection coming soon. Due on Sunday, May 5th.
What Is the DOM?
When a browser loads an HTML file, it does not just display the text. It reads the HTML and builds a tree of objects in memory — one object for every element on the page. This tree is called the Document Object Model, or DOM.
Every tag you write in HTML becomes a node in that tree. The <html> element is the root, <body> is its child, and each element inside the body is a child of that, and so on.
Start by creating a new folder on your computer and adding an index.html file to it with this content:
<html>
	<head>
		<title>DOM Example</title>
	</head>
	<body>
		<h1 id="page-title">Welcome</h1>
		<p class="intro">This is a paragraph.</p>
		<button id="main-btn">Click me</button>
	</body>
</html>
JavaScript can read and change this tree. When you update an element through JavaScript, the browser immediately updates what the user sees. This is how interactive web pages work.
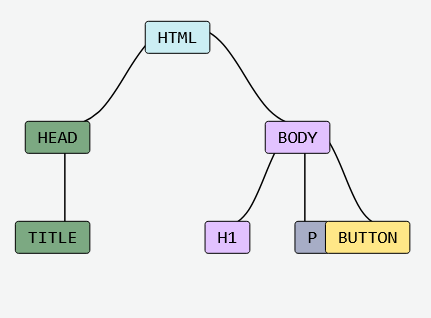
How JavaScript Connects to the DOM
The browser gives JavaScript a special built-in object called document. This object represents the entire page and is your entry point into the DOM.
You do not need to import or create document — it is always available in any JavaScript that runs in the browser.
document as a remote control for your webpage. Every button on the remote gives you a different way to find and interact with elements on the page. Selecting an Element by ID
The simplest way to select a specific element is document.getElementById(). Pass in an ID string and it returns that single element — or null if no element with that ID exists.
const title = document.getElementById("page-title");

console.log(title);
The variable title now holds a reference to the <h1> element in the DOM. You can use it to read information about the element or make changes to it.
Selecting Elements with querySelector
document.querySelector() is more flexible. It accepts any CSS selector and returns the first matching element.
// Select by ID (use # like CSS)
const title = document.querySelector("#page-title");

// Select by class (use . like CSS)
const intro = document.querySelector(".intro");

// Select by tag name
const button = document.querySelector("button");

console.log(title);
console.log(intro);
console.log(button);
If you already know CSS selectors, you already know how to use querySelector. Use # for IDs and . for classes, just like in a stylesheet.
Selecting Multiple Elements
When you need to work with a group of elements, document.querySelectorAll() returns every element that matches the selector as a NodeList — similar to an array.
// Select ALL elements matching a selector
const allParagraphs = document.querySelectorAll("p");

console.log(allParagraphs); // NodeList of every <p> on the page
console.log(allParagraphs[0]); // first <p>
console.log(allParagraphs.length); // how many were found
You can access individual items using bracket notation, just like an array. Use .length to find out how many elements were found.
What Happens When Nothing Matches
If no element on the page matches your selector, querySelector returns null. This is one of the most common sources of errors when working with the DOM — trying to use a result that is null.
// If no element matches, you get null
const missing = document.querySelector("#does-not-exist");

console.log(missing); // nullnull. Check your spelling and make sure the element actually exists on the page. Reading Properties of a Selected Element
When you select an element, you get back a JavaScript object. That object has properties you can read — things like the text inside it, its HTML content, its ID, and its class name.
The two most common are textContent and innerHTML. They look similar but behave differently:
textContentgives you only the text content, with all HTML tags stripped out.innerHTMLgives you the full HTML content inside the element, including any child tags.
// Given this HTML:
// <h1 id="page-title" class="main-heading">Welcome to <em>INF-250</em></h1>

const title = document.querySelector("#page-title");

console.log(title.textContent);  // "Welcome to INF-250"  (text content)
console.log(title.innerHTML);  // "Welcome to <em>INF-250</em>"  (includes HTML tags)
console.log(title.id);         // "page-title"
console.log(title.className);  // "main-heading"
You can also read id and className to see what attributes are set on the element. These are useful for confirming that you selected the right element.
Updating Elements with JavaScript
Selecting an element is just the first step. Once you have a reference to it, you can change it — its text, its HTML content, its styles, and its attributes.
Changing Text and HTML Content
The same properties you use to read content can also be used to write it. Assigning a new value replaces whatever was there before.
const title = document.querySelector("#page-title");

// Overwrite the text inside the element
title.textContent = "Hello, World!";

// You can also set HTML — this renders the tags
title.innerHTML = "Hello, <em>World!</em>";
Changing Styles
Every element has a style property that lets you set inline CSS. Property names use camelCase instead of hyphens — so font-size becomes fontSize.
const title = document.querySelector("#page-title");

// Access the element's inline style through the .style property
title.style.color = "red";
title.style.fontSize = "48px";
title.style.backgroundColor = "yellow";
Group Work
Create a new local index.html file and copy this code into it: https://raw.githubusercontent.com/padams-msj/text-editor/refs/heads/main/index.html